Sunday, 18 November 2012

Week 10 - Red Velvet Cupcakes

Happy Sunday!!! I hope everyone is enjoying the beautiful fall weather and slowly getting into the Christmas spirit. I went out and got all my cookie tins and boxes for my baking :). I am getting into the spirit pretty early this year, I only need to figure out a couple more gifts and pick them up, I bought one today and next pay I will be picking up another few. I will hopefully be done Christmas shopping before the crowds get too insane.

I had a nice 3 day week, with Monday being the holiday and taking Friday off after watching a movie premier Thursday night. If anyone is interested Twilight Breaking Dawn Part 2 was amazing!! Had a great night with a good friend, it was nice sharing some laughs again after so long.

So this being my last week before starting Christmas baking recipes, I thought I would make some more cupcakes. However, these are a lot more decadent and always look gorgeous on the dessert table. I made Red Velvet cupcakes with Cream Cheese Icing. The recipe I use is super moist, and stay soft and velvety for days in my cupcake keeper. I tried a new icing for these ones and it turned out great. I find a lot of cream cheese recipes are too sweet, but this one is perfect. Now my recipe for the cupcakes is originally a 2 layer 9” cake, when made into cupcakes it makes 2 dozen, and I use a tablespoon of batter per cup.

 
Red Velvet Cupcakes

Bake: 350F       Makes: 2 dozen

2 cups all-purpose flour
2 tbsps cocoa
1 tsp salt
 ½ cup butter or margarine, softened
1½ cups granulated sugar
1 tsp vanilla extract
2 eggs
1 tbsp Red Icing Color
1 cup buttermilk
1½ tsp baking soda
1 tbsp white vinegar

Preheat oven to 350ºF. Line muffin tins with papers.

In a medium bowl, stir together flour, cocoa and salt; set aside. In large bowl, beat butter, sugar and vanilla until light and fluffy. Add eggs and red icing color; mix well. Add flour mixture alternately with buttermilk to butter mixture, beating until well blended. Stir baking soda into vinegar and fold carefully into batter. Pour batter into prepared pans.

Bake 30-35 minutes or until toothpick inserted in center comes out clean. Cool 10 minutes; remove from pans to wire racks. Cool completely.


Cream Cheese Icing

2 packages (8 ounces apiece) cream cheese, at room temperature
½ cup unsalted butter, at room temperature
2½ cups confectioners' sugar, sifted
1 tsp vanilla extract
Pinch of salt

In stand mixer with paddle attachment, beat cream cheese and butter at medium speed until smooth, about 1 minute. Add sugar, vanilla, and salt. Blend on low speed for 30 seconds; beat on medium-high until fluffy.


Tips:
 
The icing will be soft after all the whipping, if you want to get creative with the icing put it in the fridge for a few minutes to harden it up again.


Mr. VIP seems to like them :P, I brought him 8 last night and he had 3 before I left lol. I also left a bunch at home fore my family, and most disappeared before I got home. So this is one of my top recipes, that I keep close for quick desserts.
 
 
Well that's all for this week, get your note pads ready because next week starts Christmas recipes!! I can't wait, because this will be my first year making a lot of them, but I have my tins already and it should be fun. I hope everyone has a good week and gets an early shopping start.
 
 
Happy Baking!!
 
 
Sey


Sunday, 11 November 2012

Week 9 - Banana Biscottis (for the dogs)

Before getting started, I would like to take a moment to thank all the men and women who have served for my country, and have put their life on the line for the peace we have today.

So last night was casino night with my boys J. It was amazing, and I looked pretty good ;P. The company was perfect, the meal was amazing, and as always the staff at the restaurant was just wonderful. My friend and I always do a 5 course surprise meal, which means the chef decides what to send out. Our meal included: crab and coleslaw, shrimp and asian pear salad, artic char on wild mushrooms, duck foie gras with a buffalo pastry, rack of venison, and a chocolate mousse with a dark chocolate passion fruit ball and passion fruit sherbet. I can honestly say not one thing was bad. The meal has always been wonderful every year, but this year was just amazing.

The week has been a tough one with stress at work, however this week is a nice short week. I hope it flys J. I also found out my friend is an aunt again :D Congrats DJ!!!!!

So my recipe this week went to the dogs…..literally :P. I decided with Christmas coming to take a break for treats for the house, and make something for Max. An old recipe that I know dogs love is banana biscottis that I used to make for all the dogs in my life. They are home made, so you know exactly what’s going into them, this is very helpful when it comes to dogs with sensitive stomachs. You can also eat them yourself. Now I did double my recipe because of the number of dogs I know lol so I have a lot more then normal.


Banana Biscotti Dog Treats

Bake: 325F       Makes: Dozen

5 cups flour
1½ cups banana
½ tsp baking soda
2 tsp vanilla
1 egg
1/8 c. peanuts (optional)
¼ cup vegetable oil


Preheat oven 325 degrees.

In a large mixing bowl stir together flour, baking soda, and peanuts. In a separate bowl combine banana, vanilla, egg, and vegetable oil.

Make a well in the center of the dry mixture, pour wet mixture into the well. Blend together, adding warm water, a teaspoon at a time. Knead until the dough comes together.

On a floured surface shape dough into a long rectangle, that is 1 inch thick and 6 inches tall. Length depends on the amount of dough.

Bake on an ungreased cookie sheet for 30-40 minutes. Remove from oven and let cool 10 minutes. Slice into ½” to 1“ biscotti slices. Bake another 10 minutes or until golden brown.

 
Tips:
I made my biscottis thicker, as my dogs are large. You can change up the sizes though depending on your dog. These treats freeze great, and that is actually how I leave them. I put them in a freezer bag and just leave them on the door, and just give them to Max frozen, it adds a nice crunch.


They don't have to be perfect.


When you cut them, they look great.


I broiled mine a bit to get a nice brown colour


He gave the final verdict that they were good :)


That's all for this week, I hope all the lucky puppies enjoy their treats. Don't forget to leave a comment, they are always appreciated.


Happy Baking!!

Sey

Sunday, 4 November 2012

Week 8 - M&M Cookies

Friday was amazing :). Mr. VIP and I took my nephew to the Museum of Nature to see the Dinosaurs. He loved it, as soon as he walked in and saw them he said “Rawr!!!”. He had a blast running around the museum, after stopping for lunch we took him to the pet store and the fish store. He was just beside himself with all the excitement :). By the end of the day, when we were driving him home, he was passed out in his car seat. Although Dany and I were pretty exhausted too when we finally sat down at his house lol. It was really nice having him for the day though :), he is a great kid to take places, and Dany and I had a lot of fun playing with him.

The tired boy :)
 
 
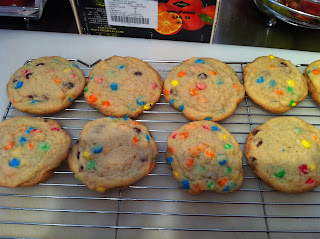
So this weekend I made M&M cookies, it had been forever since I made these. They were my favourite as a kid, because I love mini M&M’s ;P. I made large cookies, however this recipe does make a lot of “regular” size cookies as well.
 
M&M Cookies
Bake: 350F        Makes: 3 dozen
1 cup butter or margarine
½ cup granulated sugar
½ cup brown sugar
1 large egg
1 tsp vanilla extract
2 cups all purpose flour
½ tsp baking soda
⅛ tsp salt
1½ cups mini M&M’s
¾ cups chopped nuts (optional)
 
In a large bowl cream together butter and sugars until light and fluffy; beat in egg and vanilla.
 
In medium bowl, combine flour, baking soda, and salt; blend into wet mixture. Stir in M&M’s and nuts until combined. Drop by heaping teaspoonfuls onto prepared cookie sheet, about 2 inches apart. Bake 10-13 minutes or until edges are brown, without over baking. Let cool on tray for 1 minute, then transfer to wire rack to cool completely.


I can't believe it is already November, this year is just flying. Next weekend is already my Casino Night, it feels like we just went. Hopefully everyone is enjoying their November so far, and has started their Christmas shopping ;).
 
 
Happy Baking!
 
Sey


Week 7 - Cupcakes

Happy Halloween!!! I love Halloween, I love seeing all the little kids in costumes, the different baked goods, and all the wonderful decorations.

I know!! I am late again, but these cupcakes were insane to make and it was a busy week. Hopefully this is the last time my posts are late, but I can’t guarantee it.

Mr. VIP found out that the challenge was cupcakes for this week, one of his favourites ;P. Rather then doing regular cupcakes, I did 3 different types, with 2 having fillings inside. It turned out to be a great idea, because everyone loved them.

Now there are a lot of recipes this week, so I’m not going to do much talking :P.

The first kind I made was Raspberry filled Vanilla Cupcakes with White Chocolate Buttercream Icing. The second version I made was Caramel filled Chocolate Cupcakes with Marshmallow Icing. The last kind was a simple cupcake. Vanilla Confetti Cupcakes with Buttercream Icing.

 
Vanilla-Fudge Cupcakes

Oven 350F

¾ cup butter
2 eggs
2 ¾ cups flour
1 ½ teaspoon baking powder
½ teaspoon baking soda
½ teaspoon salt
1 ½ cup sugar
2 teaspoons vanilla
1 ¼ cup butter milk or sour milk
2/3 cup chocolate-flavoured syrup

Allow butter and eggs to stand at room temperature for 30 minutes. Meanwhile, line muffin pans with paper liners. In a medium bowl stir together flour, baking powder, baking soda, and salt. Set aside.

In large mixing bowl beat butter with an electric mixer on low to medium speed about 30 seconds. Add sugar and vanilla; beat until fluffy. Add eggs 1 at a time, beating on low to medium speed 1 minute after each addition and scrapping bow frequently. Alternately add flour mixture and butter milk mixture, beating on low speed after each addition just until combined. Reserve 2 cups batter, divide remaining batter into muffin cups (1 heaping tablespoon each).

For this recipe, you can either leave out the chocolate syrup and make all vanilla cupcakes, double the chocolate syrup and make all fudge cupcakes, or do as above and make both types, or marble them. If you want a confetti cupcake, make the vanilla cupcake batter and add 1 cup of coloured sprinkles at the end.

In a small mixing bowl combine chocolate syrup and reserved 2 cups of batter. Beat on low speed until well combined. Divide batter into muffin cups.

Bake for 12 to 15 minutes. Let cool in pan for 10 minutes, remove and let finish cooling on wire rack.


Raspberry Cupcake Filling

Makes: Fills 24 cupcakes

1 pkg (16 ounces) frozen raspberries packed in sugar thawed
1/3 cup granulated sugar
3 tbsp cornstarch
1 tsp lemon juice
 
Drain raspberries, reserving liquid. Add enough water to liquid to equal 1 1/4 cups. In large saucepan, combine berries, liquid, sugar, cornstarch and lemon juice; mix well. Heat and stir until mixture boils and thickens. Cool completely. Fill cupcake.


Chocolate Buttercream Frosting

Makes: 2½ cups
1 cup unsalted butter, softened
3-4 cups confectioners sugar, SIFTED
1/4 teaspoon table salt
1 tbsp vanilla extract
up to 4 tbsp milk or heavy cream
½ cup to 1 cup of melted chocolate

Beat butter for a few minutes with a mixer with the paddle attachment on medium speed. Add 3 cups of powdered sugar and turn your mixer on the lowest speed (so the sugar doesn’t blow everywhere) until the sugar has been incorporated with the butter. Increase mixer speed to medium and add vanilla extract, salt, and 2 tablespoons of milk/cream and beat for 3 minutes. At the end add the cooled melted chocolate (dark, milk or white). If your frosting needs a more stiff consistency, add remaining sugar. If your frosting needs to be thinned out, add remaining milk 1 tablespoons at a time.


Classic Vanilla Buttercream Frosting

Makes: 2½ cups

1 cup unsalted butter, softened
3-4 cups confectioners sugar, SIFTED
1/4 teaspoon table salt
1 tbsp vanilla extract
up to 4 tbsp milk or heavy cream

Beat butter for a few minutes with a mixer with the paddle attachment on medium speed. Add 3 cups of powdered sugar and turn your mixer on the lowest speed (so the sugar doesn’t blow everywhere) until the sugar has been incorporated with the butter. Increase mixer speed to medium and add vanilla extract, salt, and 2 tablespoons of milk/cream and beat for 3 minutes. If your frosting needs a more stiff consistency, add remaining sugar. If your frosting needs to be thinned out, add remaining milk 1 tablespoons at a time.


Marshmallow Icing 

Makes: Icing for 24 cupcakes

3 packages unflavored gelatin
1 cup ice cold water, divided
12 ounces granulated sugar, approximately 1 1/2 cups
1 cup light corn syrup
1/4 teaspoon kosher salt
1 teaspoon vanilla extract

Place the gelatin into the bowl of a stand mixer along with 1/2 cup of the water. Have the whisk attachment standing by.

In a small saucepan combine the remaining 1/2 cup water, granulated sugar, corn syrup and salt. Place over medium high heat, cover and allow to cook for 3 to 4 minutes. Uncover, clip a candy thermometer onto the side of the pan and continue to cook until the mixture reaches 240F, approximately 7 to 8 minutes. Once the mixture reaches this temperature, immediately remove from the heat. Let cool to 210F

Turn the mixer on low speed and, while running, slowly pour the sugar syrup down the side of the bowl into the gelatin mixture. Once you have added all of the syrup, increase the speed to high. Continue to whip until the mixture becomes very thick and is lukewarm, approximately 12 to 15 minutes. Add the vanilla during the last minute of whipping.

Fill piping bag and use immediately. This is real marshmallow, not marshmallow flavoured icing.


Tips:

To fill the cupcake, I cut out a piece from the center and fill with about a teaspoon of filling. For the caramel, I bought the caramel from the store in the squeeze tube. I also took my torch and toasted the marshmallow.


So after the feedback from my boyfriend and all my coworkers, apparently these were great cupcakes :). I am going to experiment more with fillings, cause they turned out wonderful. I hope everyone enjoyed their Halloween!

Happy Baking!

Sey