Home made chocolates can be tricky. If they aren't done right the chocolate can taste waxy and be unpleasant. I use the chocolate wafers from Bulk Barn, also known as candy melts. They work great, taste like real chocolate and the chocolate molds are some simple. So I did 3 types of chocolate for this challenges. A solid chocolate, peanut butter cups, and fruit filled. They turned out great and I plan on experimenting more with the flavours and molds. Now you can microwave the chocolate to melt it, but I prefer to use a double broiler. This gives a smoother chocolate, and you can keep it warm until you need it.
Chocolates
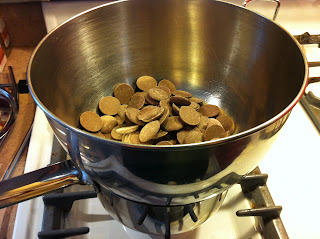
Place chocolate in a double broiler to melt until smooth. If you don't have a double broiler, fill a small pot with water and place a smaller pot or a bowl on top, it shouldn't touch the water. Do not let the steam or any water come in contact with the chocolate. Heat until smooth, turn to low heat when waiting for molds to set.
Solid Chocolate
Pour chocolate in to molds and let sit in fridge for 10 to 15 minutes. Flip molds on to a flat surface and lightly tap the mold. The chocolates should easily falls out, if they do not they are not ready. Let chill a little longer. Finished chocolates should be kept in the fridge or freezer.
Peanut Butter Filling
1 1/2 tablespoons butter, softened
1/2 cup chunky style peanut butter, room temperature3/4 cup confectioners' sugar, sifted
Makes:
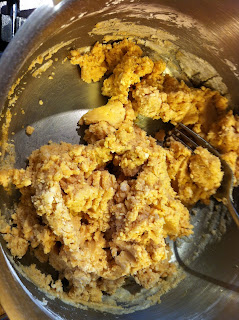
Approximately 30 candy centres.Cut butter in small pieces and put in small saucepan over low heat. Add peanut butter and stir until melted. Remove from heat. Stir in confectioners' sugar, blending well. Add more confectioners' sugar, as necessary, to form a pliable mass. Wrap in plastic and refrigerate for about an hour. Use filling as a candy centre for dipping, or as a centre between two layers of coating.
Fruit Filled
Coat the sides and bottom of the molds. Put in refrigerator for 3-4 minutes. Wash and dry choice fruit. Chop it in to small pieces. Place enough fruit to fill molds, without going above the edge. Pour chocolate over fruit and let set in fridge for 10 to 15 minutes. Flip molds on to a flat surface and lightly tap the mold. The chocolates should easily falls out, if they do not they are not ready. Let chill a little longer. Finished chocolates should be kept in the fridge or freezer.
Place chocolate in to a double broiler.
It can be bought in any colour or flavour.
Heat until melted and smooth.
For solid chocolate, fill molds to the top. Tap lightly to flatten tops.
Place in fridge for 10 to 15 minutes. Flip on to flat surface.
Tap gently, if they do not release easily, place back in fridge for another few minutes.
You will now have smooth chocolates.
Peanut Butter Filling

Melt peanut butter and butter together.
Mixture should be smooth, unless using chunky peanut butter.
After adding sugar, mixture will look like cookie dough.
Place mixture in plastic wrap and chill for 1 hour.
One way to do a chocolate shell is to fill a mold one at a time, only file half full, roll the mold around to coat the bottom and sides. Than flip the mold over the double broiler and let the excess chocolate run out.
They will end up looking like this.
Another option is filling the mold a third to half way and using a small paint brush to brush it up the sides.
This is my preferred method, as the shell is not super thick at the bottom when this is done.
I used maraschino cherries for some chocolates. I also used chopped up strawberries for others.
Drop a cherry in each mold.
Make sure any filling does not go over the top of the mold. I has to squish the cherries a bit to make sure they did not go over the top.
When covered and chilled, you will have a wonderful plate of homemade chocolates for everyone to try. Or you can keep them all to yourself.
Tips:
Start simple, making chocolates are a lot easier than you think. Start easy and work your way up, and soon you will be making complicated chocolates with no problem.
I enjoyed this challenge so much. The chocolates turn out great, I can not wait to try more fillings. I will post any amazing recipes I come across, so everyone can try it. Do not forget to send me any requests, or recipe ideas for me to try. I have already gotten a few to try out. Also do not hesitate to leave any comments you may have about the blog, good, bad, in between. I take them all.
Happy Baking!
Sey


No comments:
Post a Comment